AcelleMail is installed from the browser. Once the application files are on your server, an installation wizard checks the server, creates the first admin account, sets up the database and gives you the cron job to add.
After the installation, a user still cannot send email. The application needs a sending server, a plan that uses that server, and a user subscribed to the plan.
This guide has two parts:
- Install AcelleMail with the installation wizard (steps 1 to 6).
- Get started: add a sending server, set up a plan and subscribe a first user (steps 7 to 11).
Before you start#
You need:
- A server with PHP 8.3 or newer, MySQL and a web server (Apache or Nginx). Server Requirements and Hosting Options helps you choose one.
- An empty MySQL database, and a MySQL user with a password that can access it. The wizard does not create the database.
- The AcelleMail package, a zip file.
- A way to add a cron job on the server: SSH access or a hosting control panel.
- An account with an email sending service, or the details of an SMTP server. This guide uses Amazon SES as the example.
1. Upload AcelleMail to your server#
Unzip the AcelleMail package into the document root of your domain or subdomain.
On Apache, the .htaccess file in the package forwards every request to its public folder, so the package can sit directly in the document root. This needs mod_rewrite to be enabled.
On Nginx, set the root of the site to the public folder inside the package.
Then open your domain in a browser. AcelleMail is not installed yet, so it redirects to the installation wizard:
https://your-domain.com/install
2. Check the system#
The wizard has five steps, shown at the top of every screen: System Check, Configuration, Database, Background Jobs and Finish.
The first screen is System Requirements. It checks what AcelleMail needs from the server:
| Checked |
Items |
| PHP version |
8.3.0 or higher |
| PHP extensions |
MySQLi, OpenSSL, Multibyte String, PHP PDO, Tokenizer, PHP ZIP, IMAP, SQLite3, PHP GD, PHP FileInfo, PHP Curl, PHP XML |
| PHP functions |
proc_close(), escapeshellarg() |
| Writable folders, under Directory Permissions |
storage/app, storage/framework, storage/logs, storage/job, bootstrap/cache |
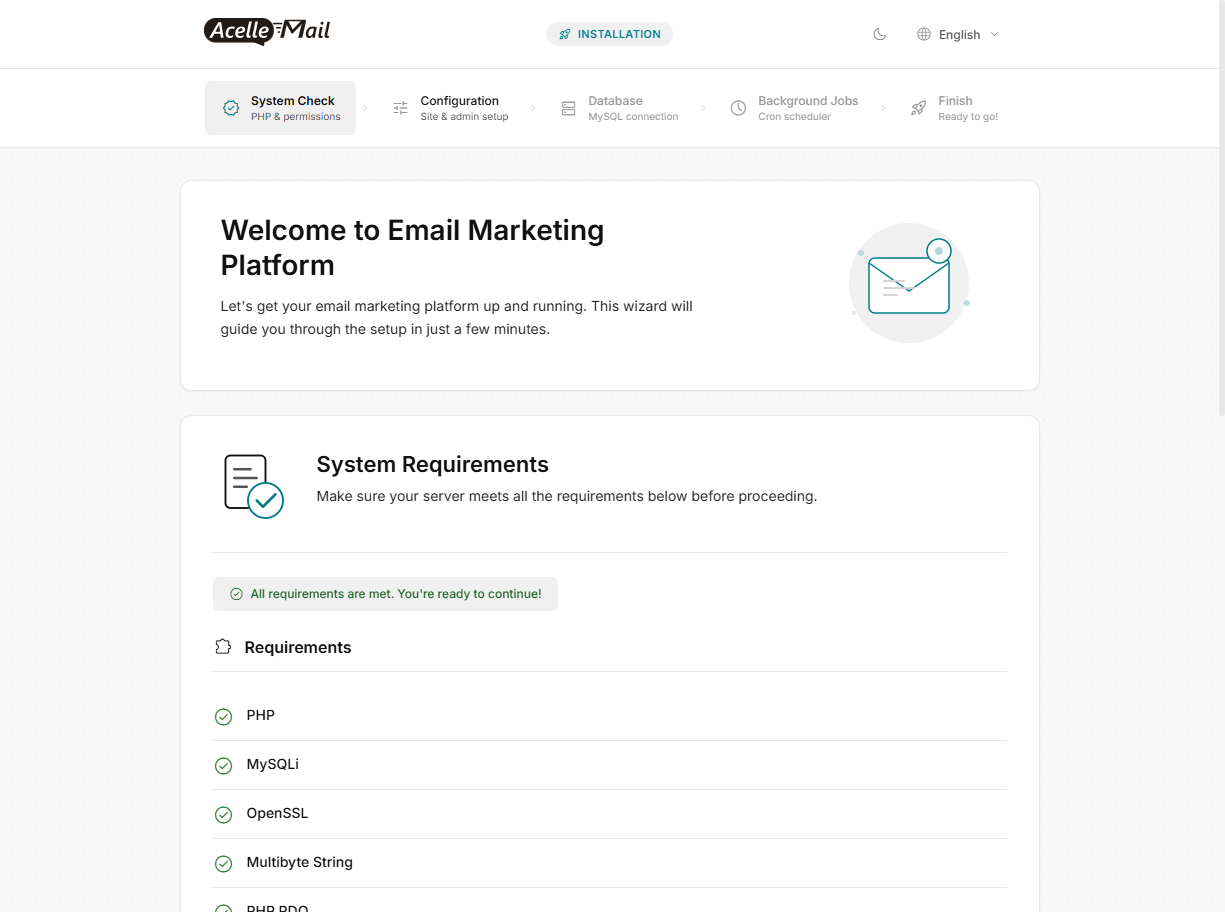
When every row has a green check, the screen shows All requirements are met. You're ready to continue!. Click Continue.
If a requirement is not met#
The screen shows Some requirements are not met. Please fix them and try again. and each failed row says what is missing. For a PHP extension it reads like this:
IMAP extension is required
For a folder it reads:
The directory must be writable by the web server
Install or enable the missing PHP extension, or make the folder writable for the web server user. Then click Check Again.
3. Enter the site and admin details#
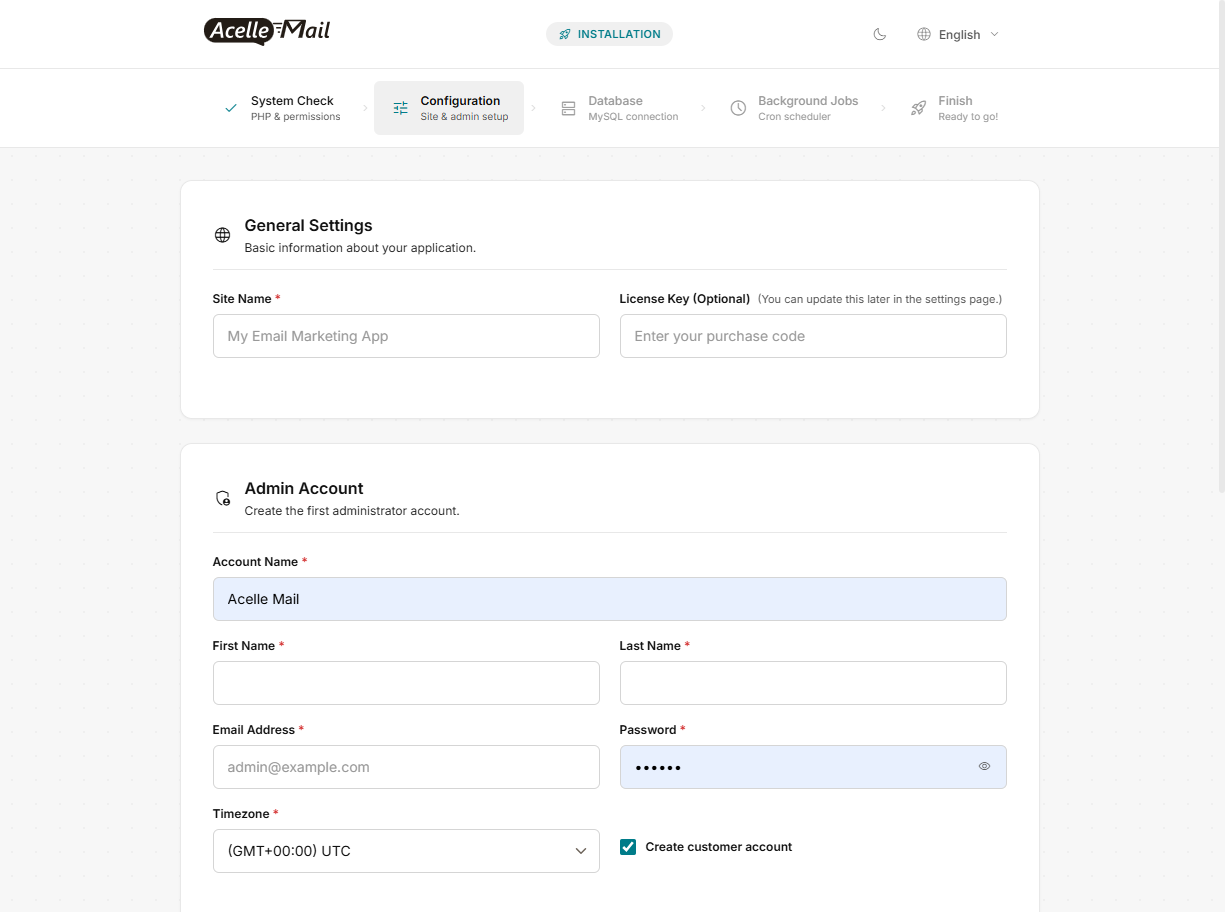
The Configuration step has three sections on one page.
General Settings#
Enter the Site Name and Site Description.
License Key (Optional) can stay empty. You can add the key later in the settings. If you enter one, the wizard verifies it before it continues.
Admin Account#
Enter Account Name, First Name, Last Name, Email Address, Password and Timezone.
This is the first administrator. You log in with this email address and password when the installation is done.
Leave Create customer account ticked. The administrator then also gets a user account, which you use in step 11 to test a plan without creating another login.
System Email#
Further down the same page, System Email sets how the application sends its own emails, such as account activation and password reset messages. It is separate from the sending servers used for campaigns, which you add in step 8.
Choose a Mail Driver:
- SMTP: enter SMTP Host, Port, Encryption, Username and Password. The wizard tests the connection and does not continue if it fails.
- Sendmail: uses the mail program on the server. Check the Sendmail Path.
SMTP is the better choice for a live site. The wizard's own note says that Sendmail may have deliverability issues.
Enter From Email and From Name, then click Save & Continue.
4. Connect the database#
On Database Configuration, enter the details of the database you prepared: Database Host, Port, Username, Password and Database Name.
For a database on the same server, the first two are usually:
Database Host: localhost
Port:          3306
Table Prefix is optional. Leave it empty unless the database is shared with another application. It can have 12 characters at most: letters, numbers and underscores.
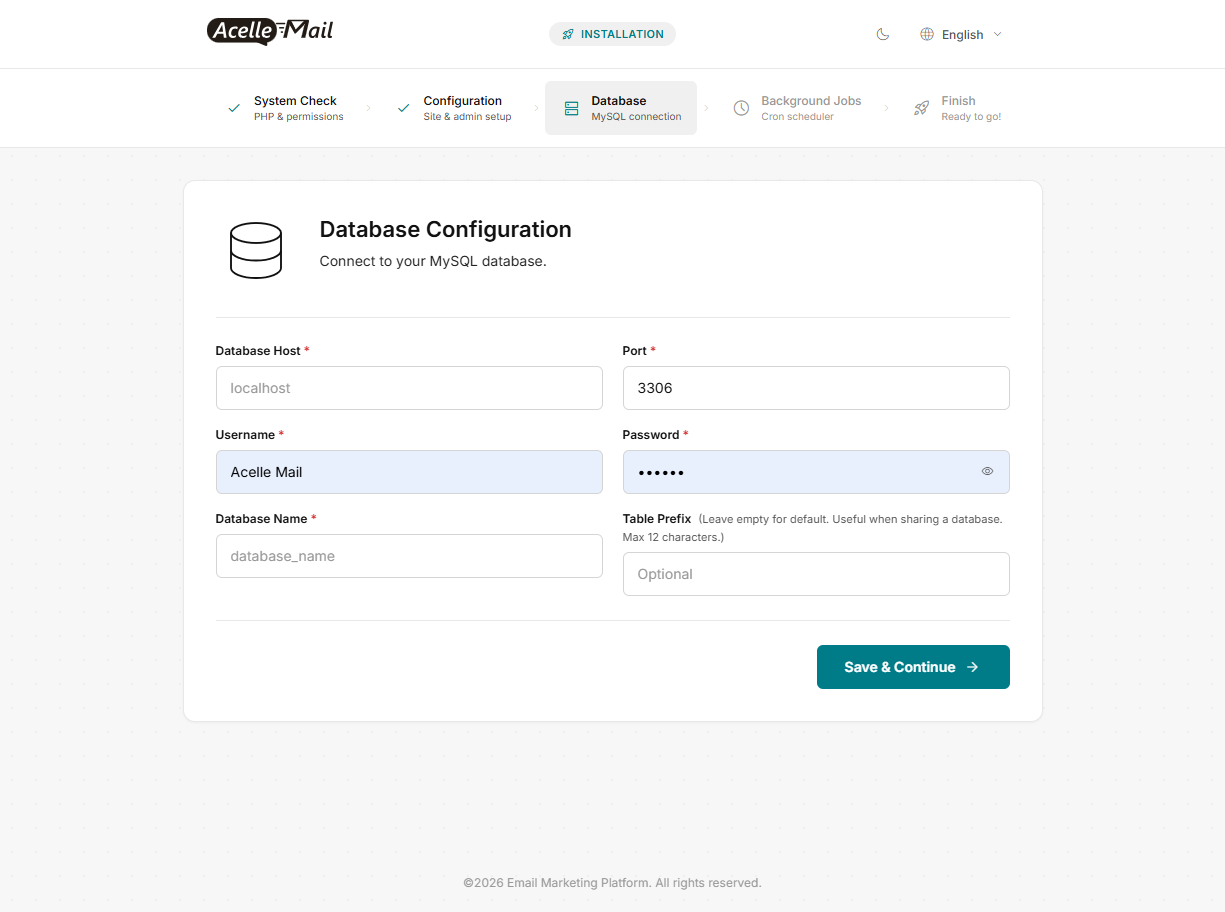
Click Save & Continue. The wizard connects to MySQL with these details. If the connection fails, the MySQL error is shown at the top of the page and you stay on this screen.
Initialize the database#
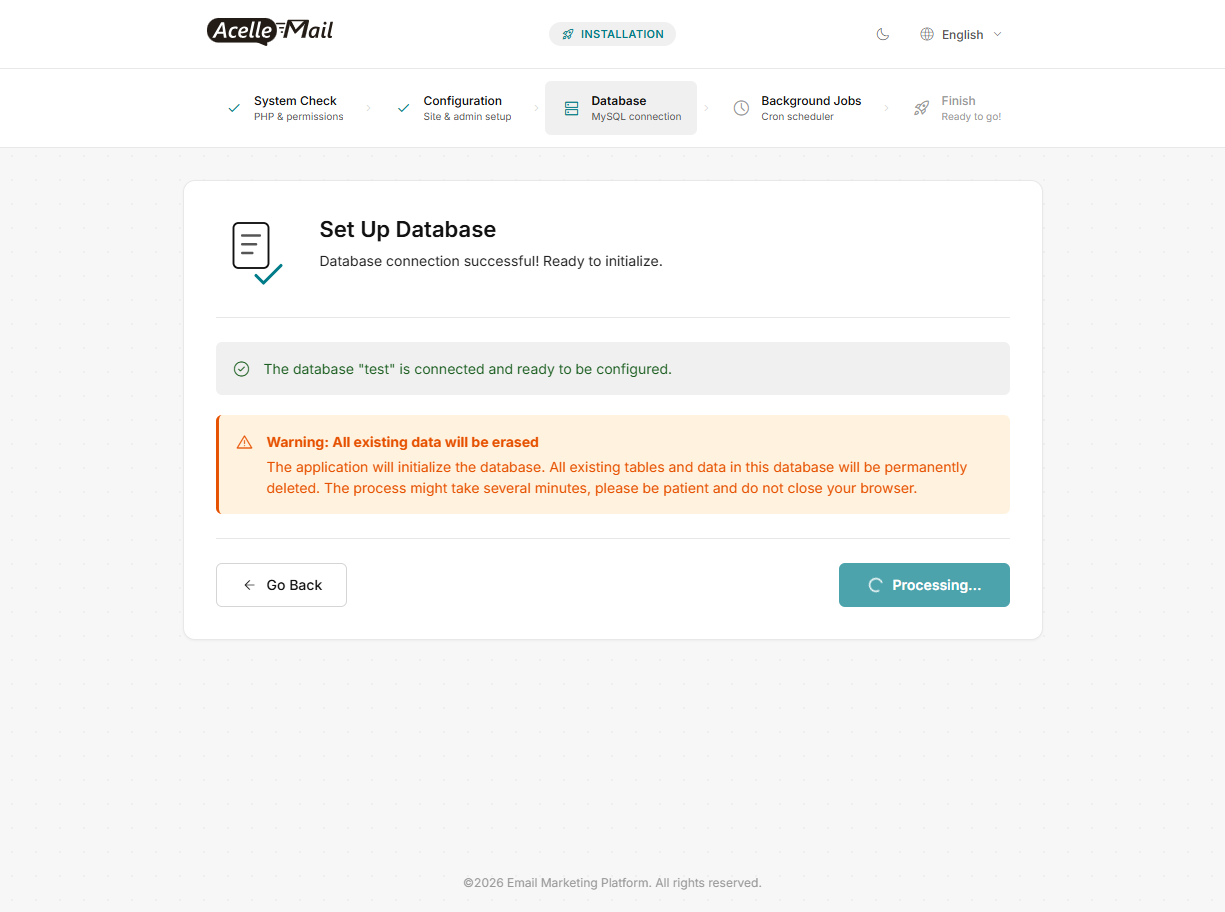
The next screen, Set Up Database, confirms that the database is connected.
It also shows Warning: All existing data will be erased. The wizard deletes every table in this database before it creates its own, so use an empty database or one whose content you do not need.
Click Initialize Database. The button changes to Processing... while the wizard creates the tables, loads the default data and creates the admin account from step 3.
This can take several minutes. Keep the browser tab open until the next screen appears.
5. Set up background jobs#
AcelleMail does its sending in the background. A cron job on the server starts that work every minute: sending campaigns, processing bounces and managing subscriptions.
Without the cron job, campaigns are not sent, so do not skip this step.
Choose the PHP path#
Under PHP Binary Path, the wizard lists the PHP programs it found on the server. Select the one that belongs to the PHP version your website runs on.
If it is not in the list, select Other path and type the path under Enter manually, for example:
/usr/local/bin/php
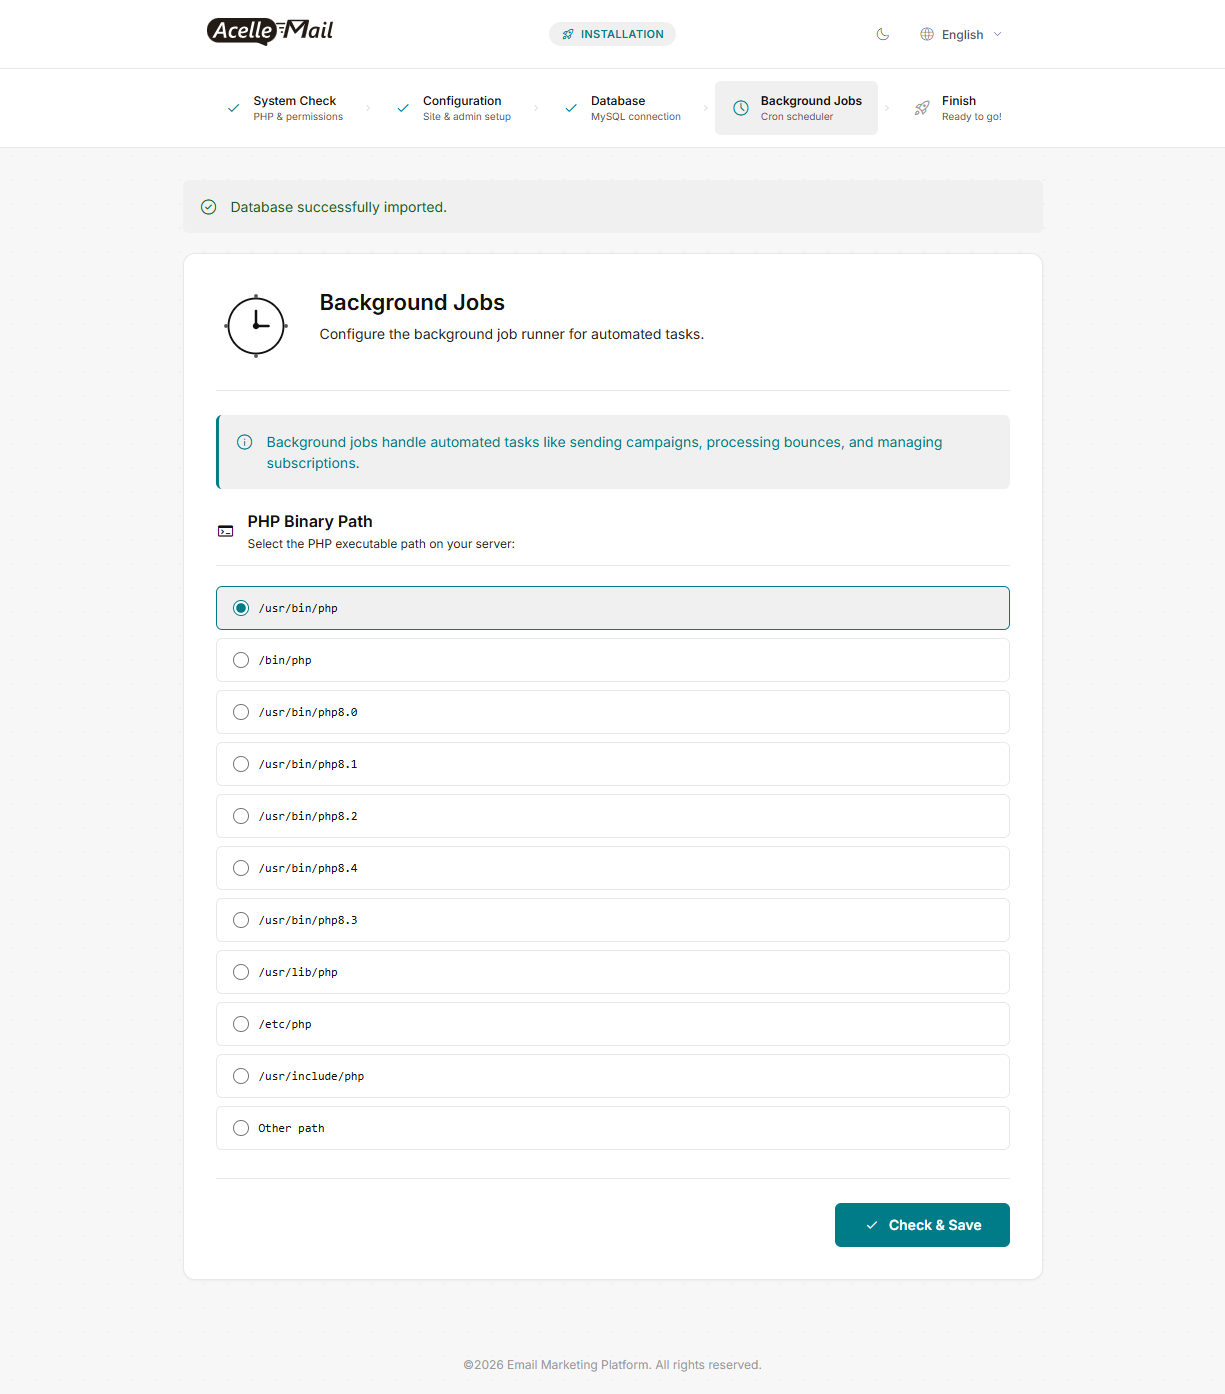
Click Check & Save. The wizard runs a short test with that PHP and shows the error if the test fails.
Add the cron job to your server#
When the path is accepted, the screen shows System settings were successfully updated and, under Add this cron job to your server:, the line to add. It looks like this:
* * * * * /usr/bin/php -q /var/www/acellemail/artisan schedule:run 2>&1
Your line contains your own PHP path and the folder where AcelleMail is installed, so click Copy to take it from the screen.
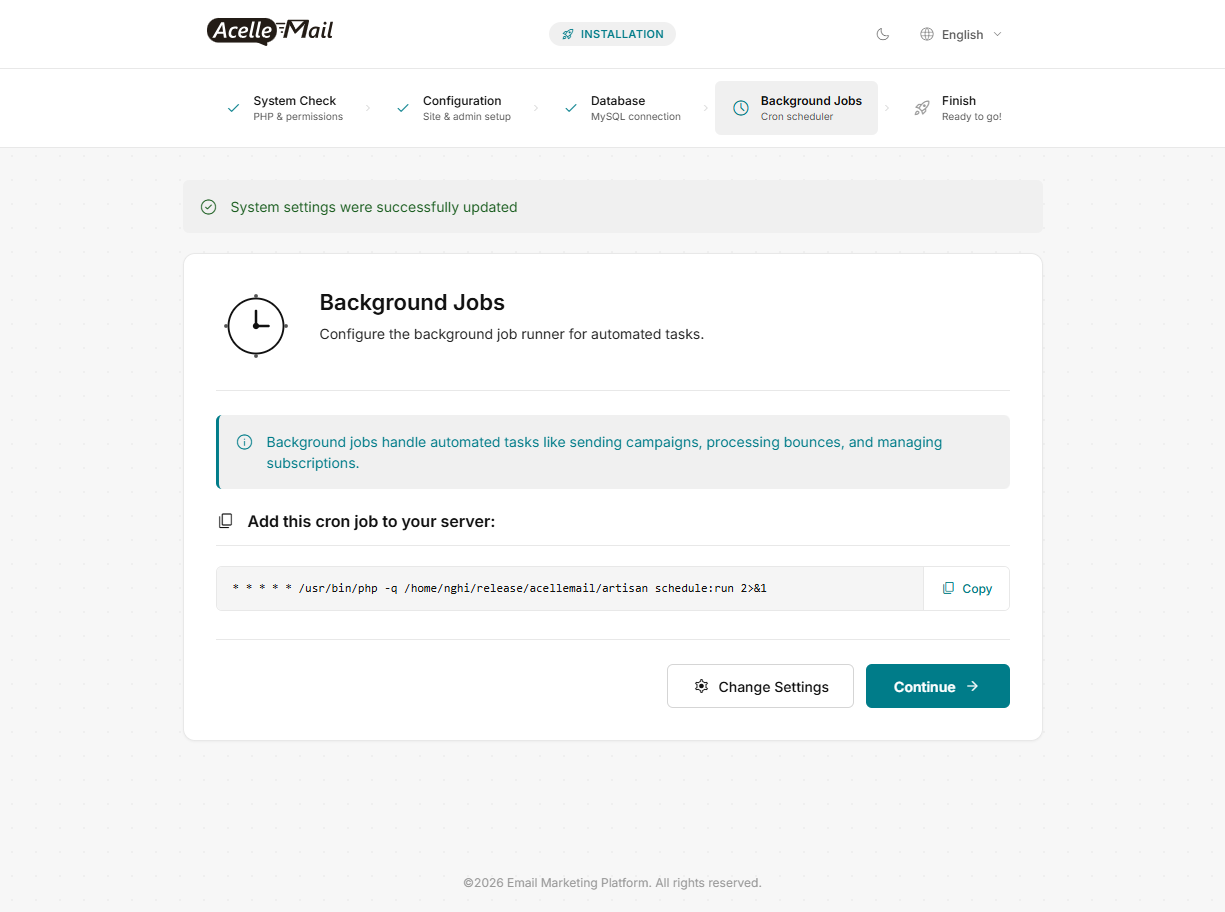
Add the line to the crontab of the user that owns the AcelleMail files. With SSH access, log in as that user and run:
crontab -e
In a hosting control panel, use its cron jobs page instead.
The wizard does not add the cron job for you, and Continue works whether or not you have added it. Add it now, then click Continue.
6. Finish the installation#
Installation Complete! shows the address of your admin panel.
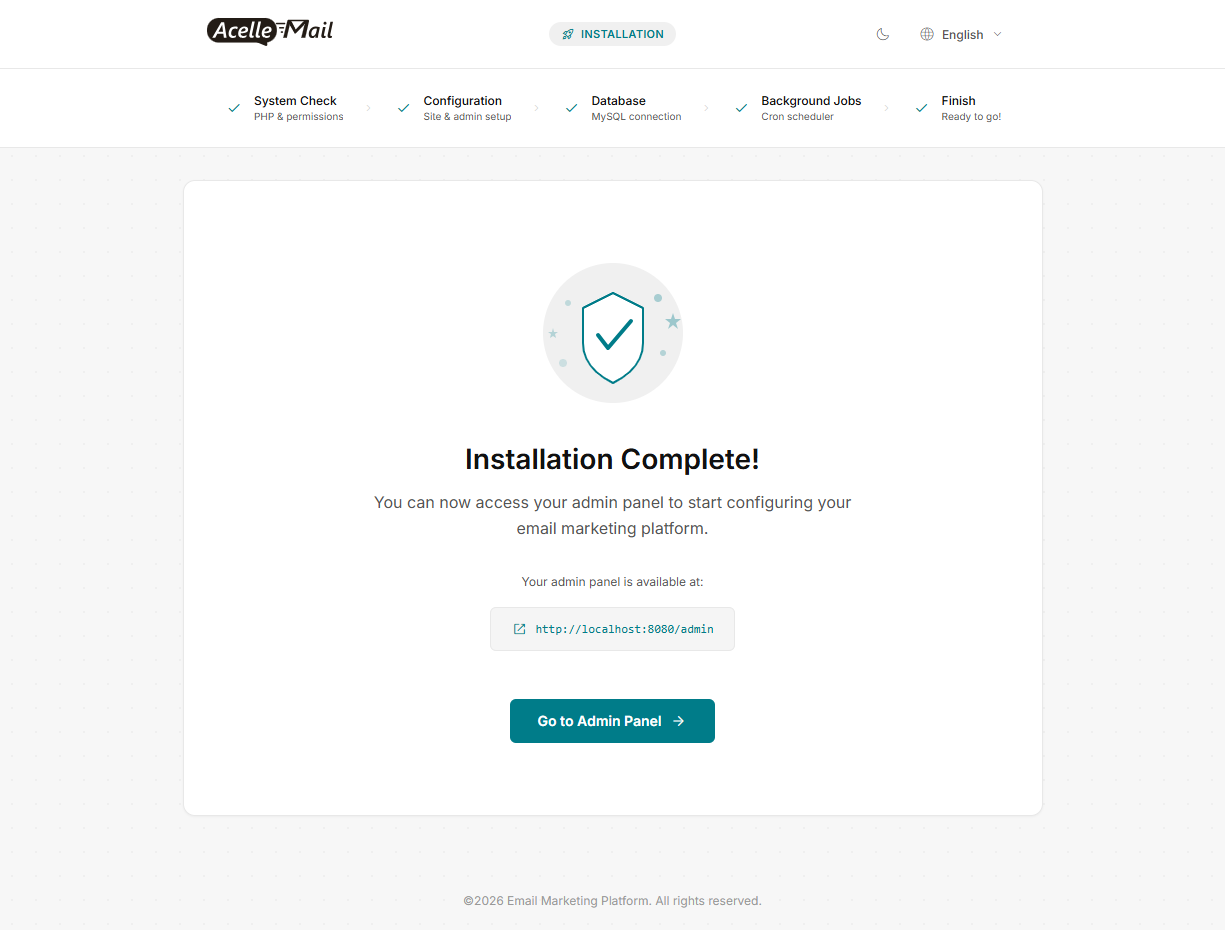
Click Go to Admin Panel and log in with the admin email address and password from step 3.
7. Open the admin panel#
The installation is done. The remaining steps prepare what a user needs to send email, and they all happen in the admin panel.
AcelleMail has two areas. The user area is where lists, campaigns and automations are created. The admin panel is where you manage sending servers, plans and customers.
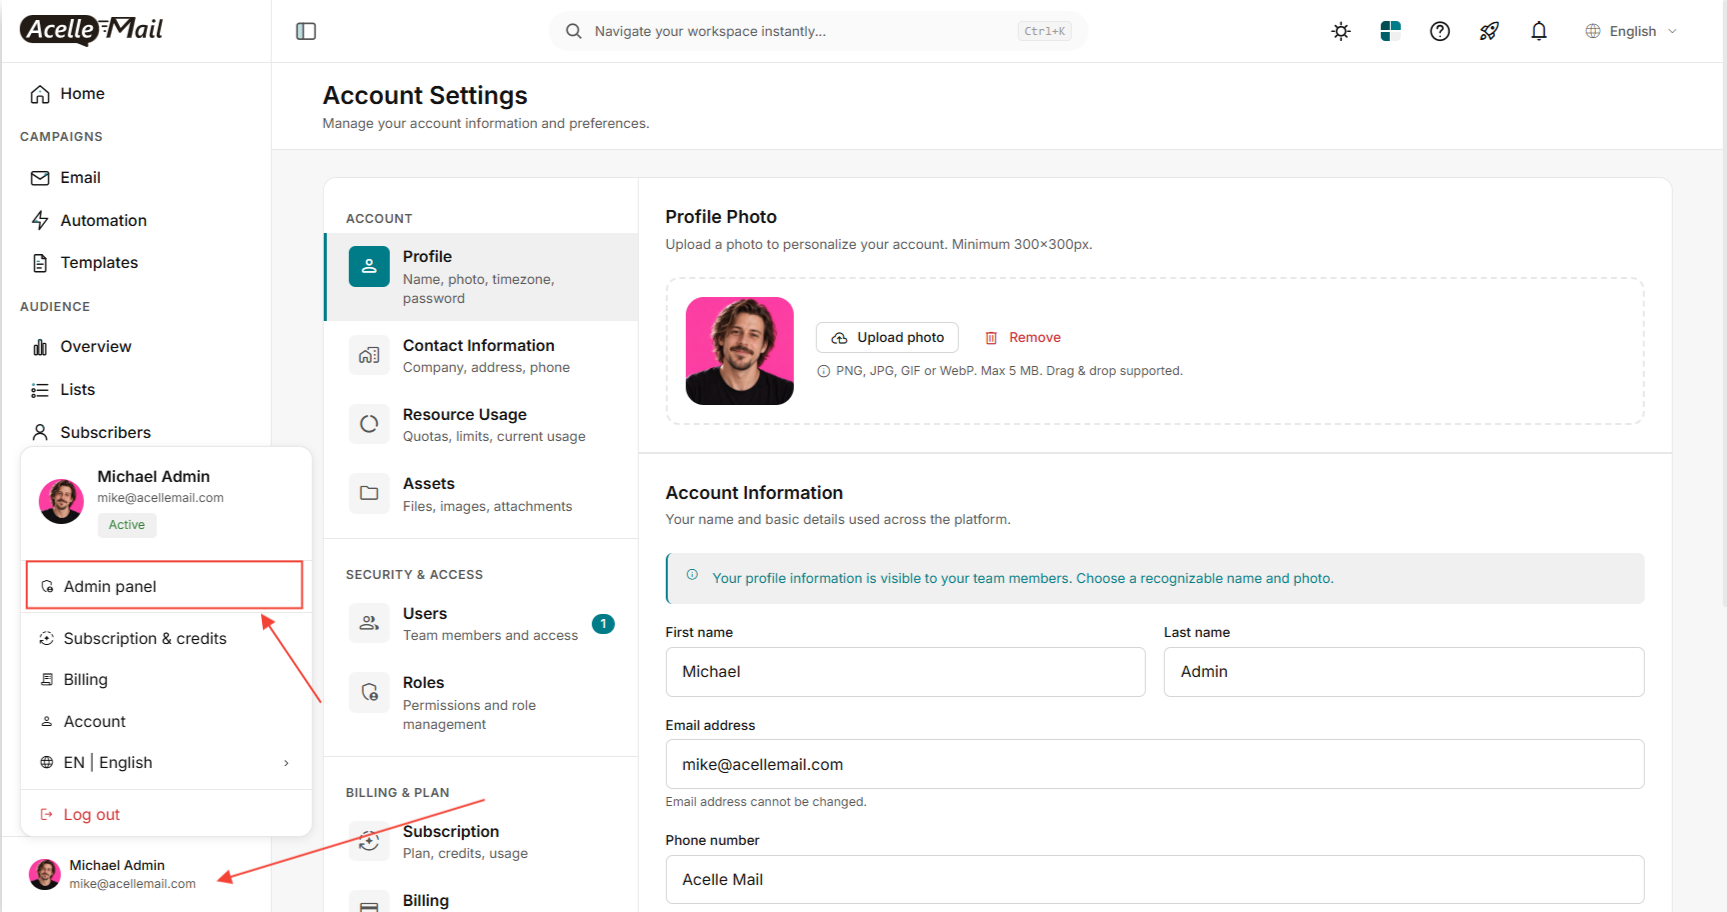
If you are in the user area after logging in, click your name at the bottom left and choose Admin panel.
8. Add a sending server#
AcelleMail does not deliver email itself. It passes each message to a sending server: an SMTP server, or a service such as Amazon SES, Mailgun or SendGrid.
In the admin panel, open:
Sending → Sending Servers
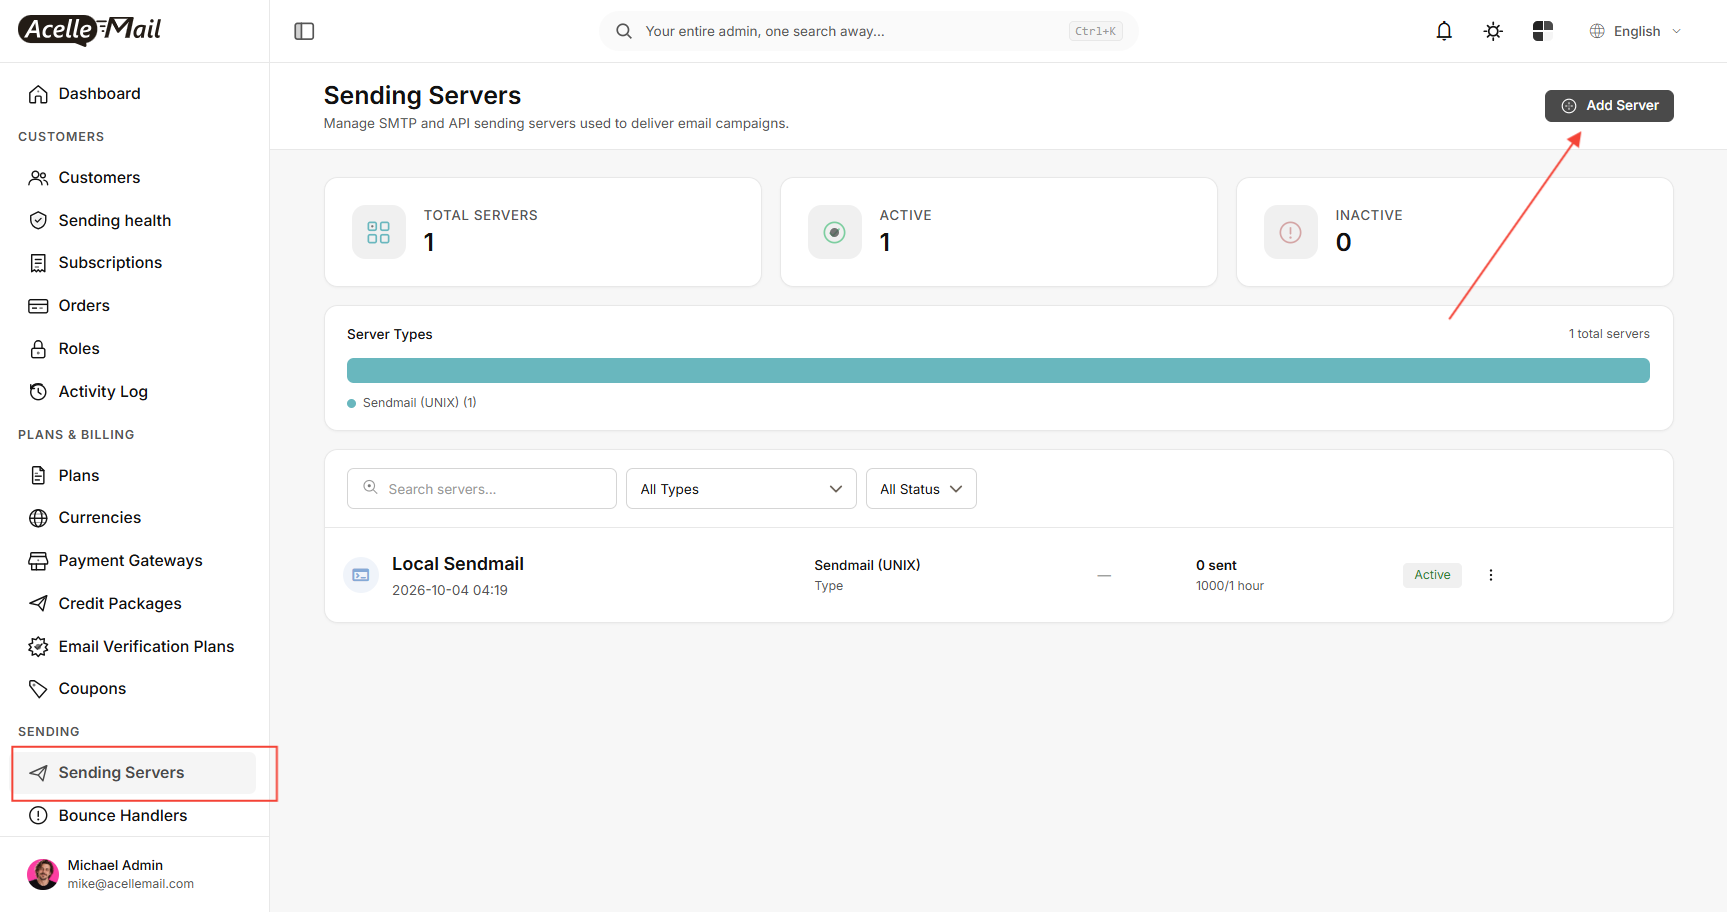
A new installation lists one server, Local Sendmail. It is a placeholder created by the installer. Its sendmail path is not a real one, so it delivers nothing until you edit it. Add a real server instead.
Click Add Server.
Choose the server type#
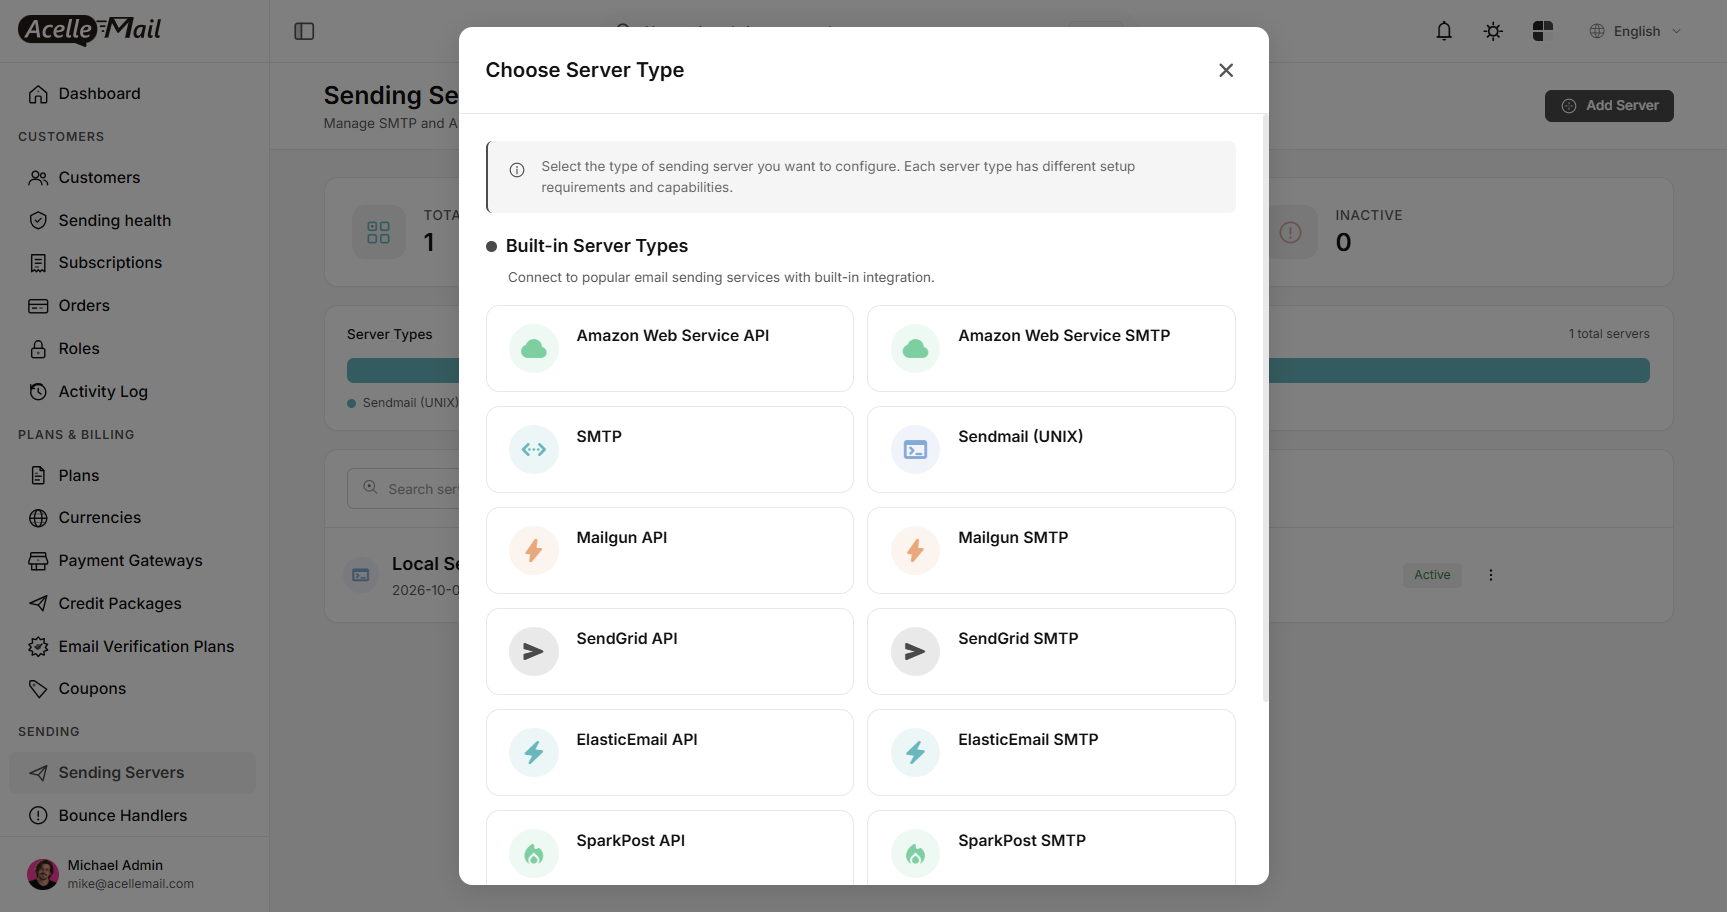
The Choose Server Type window lists the supported types, most of them as an API option and an SMTP option: Amazon Web Service, Mailgun, SendGrid, ElasticEmail, SparkPost and others.
SMTP works with any standard SMTP account.
Example: Amazon SES#
Select Amazon Web Service API.
Under Connection details, enter:
- AWS Access Key ID
- AWS Secret Key
- AWS region
Click Save Changes.
The saved server opens on its Connection tab, which has two tests. Test Connection checks the key and its permissions. Send Test Email sends a real email through the server.
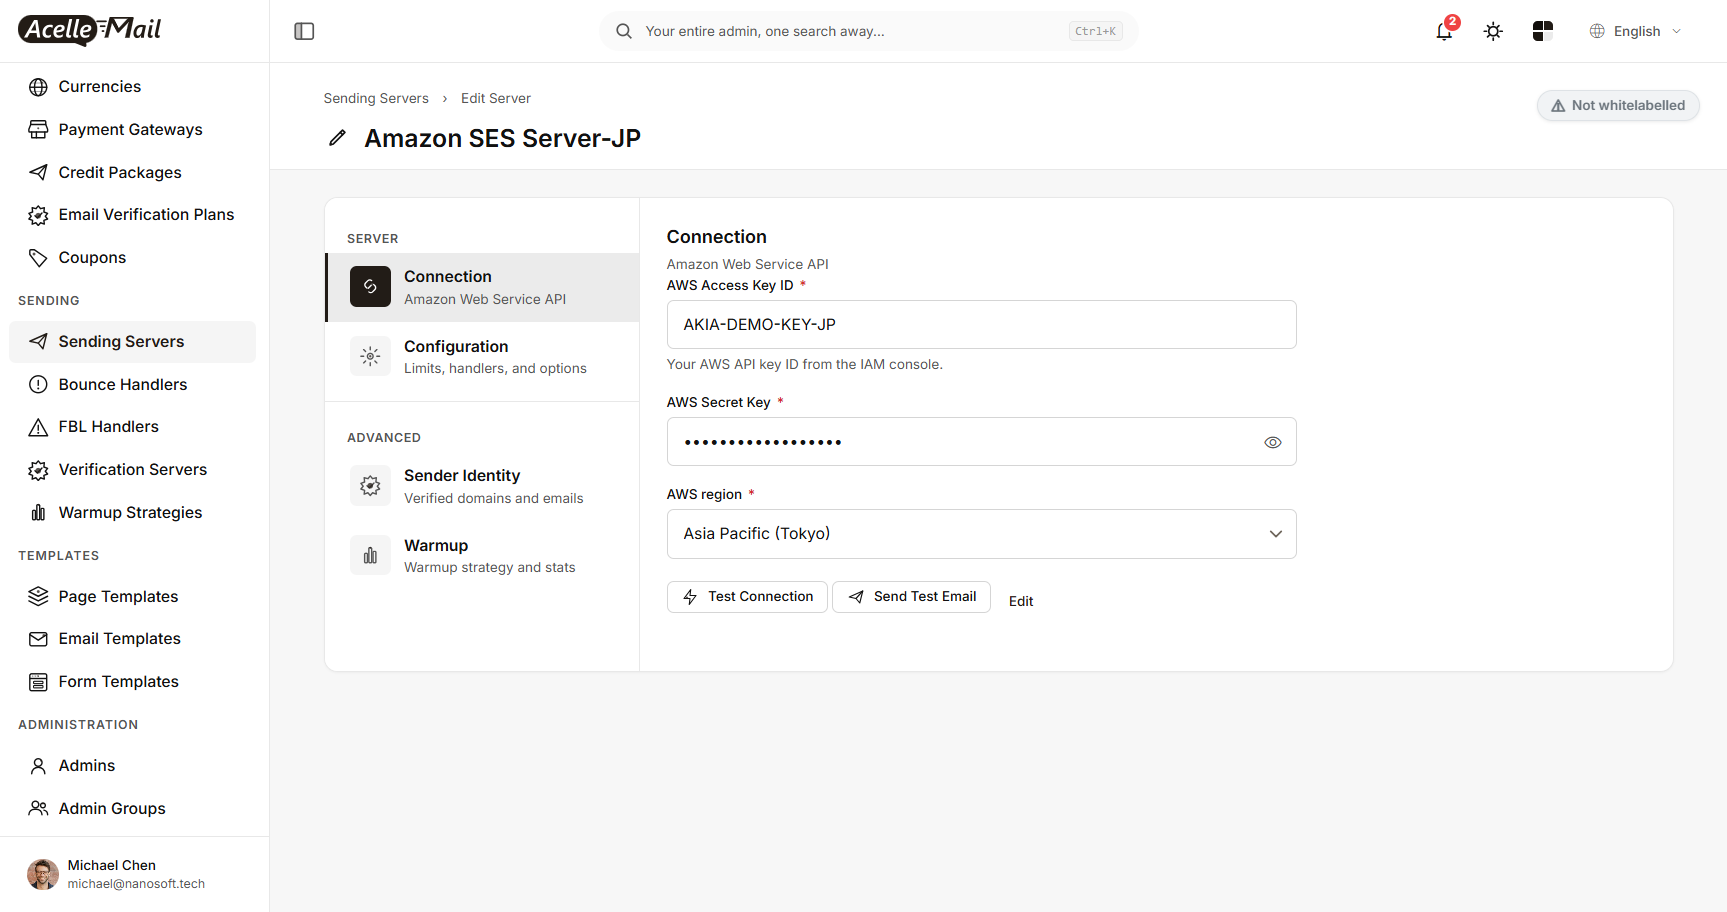
Run Test Connection before you attach the server to a plan.
How to Set Up Amazon SES with AcelleMail covers the AWS side: creating the access key, the permissions it needs and verifying your sending domain.
9. Set up a plan#
A plan is the package a user subscribes to. It sets the price, how much the user can send and store, which features are switched on, and which sending server delivers their email.
A user cannot create lists or send campaigns until they are subscribed to a plan.
Open:
Plans & Billing → Plans
A new installation comes with five plans: Free Forever, Starter, Growth, Pro and Enterprise. You can edit them, or click Create Plan to add your own.
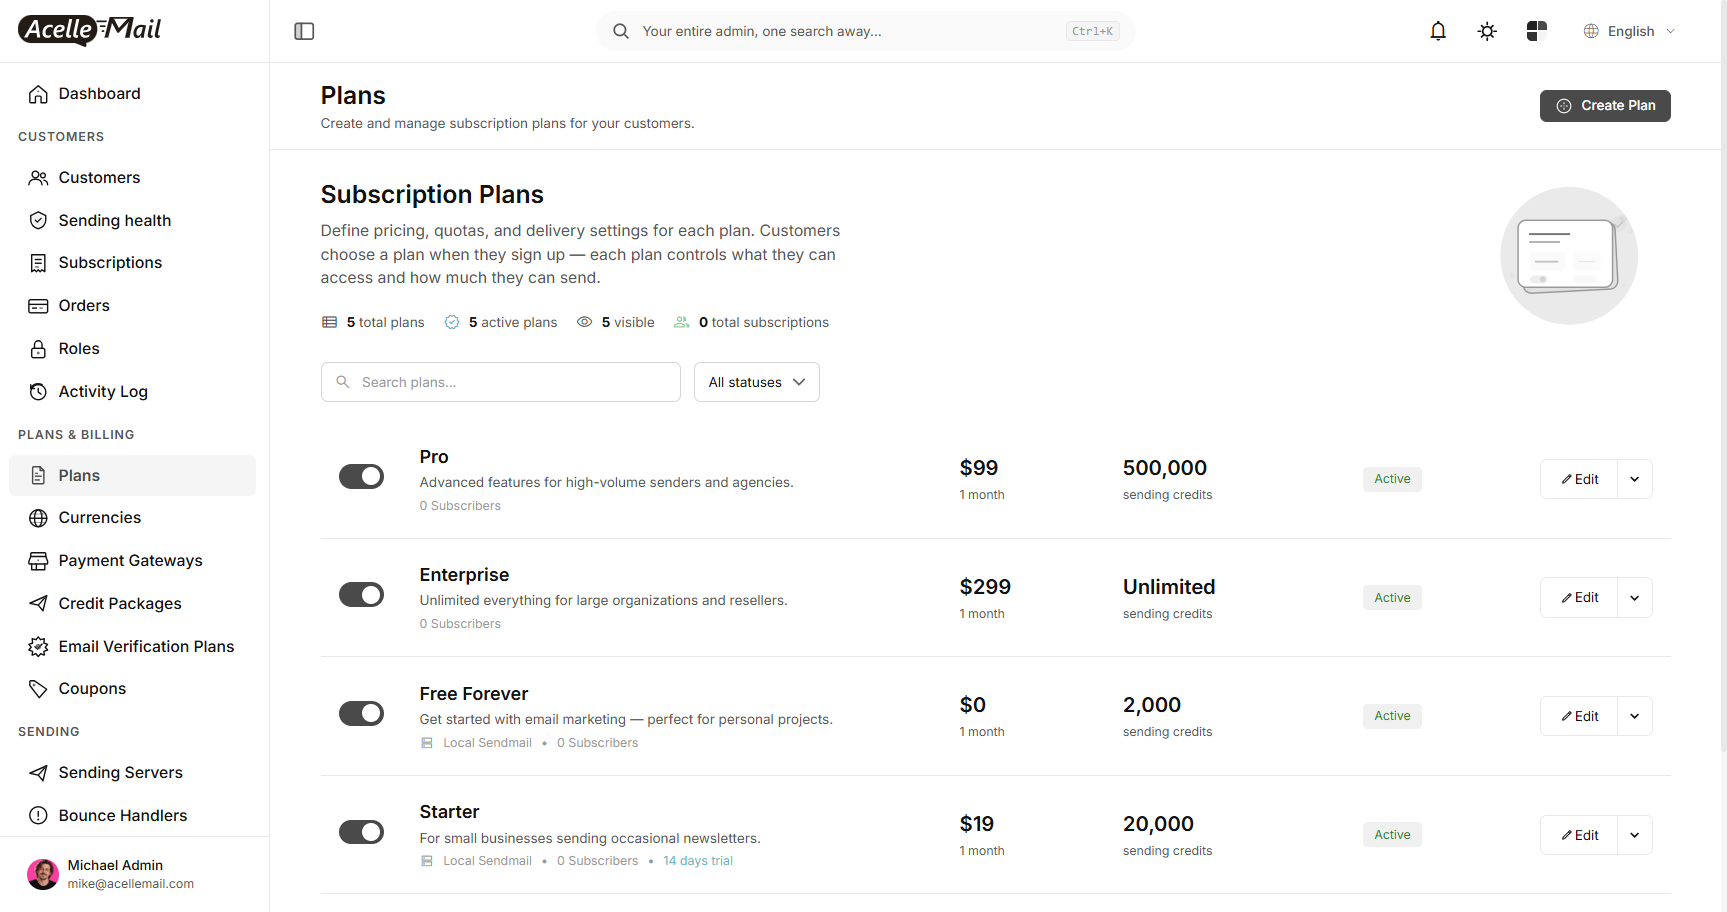
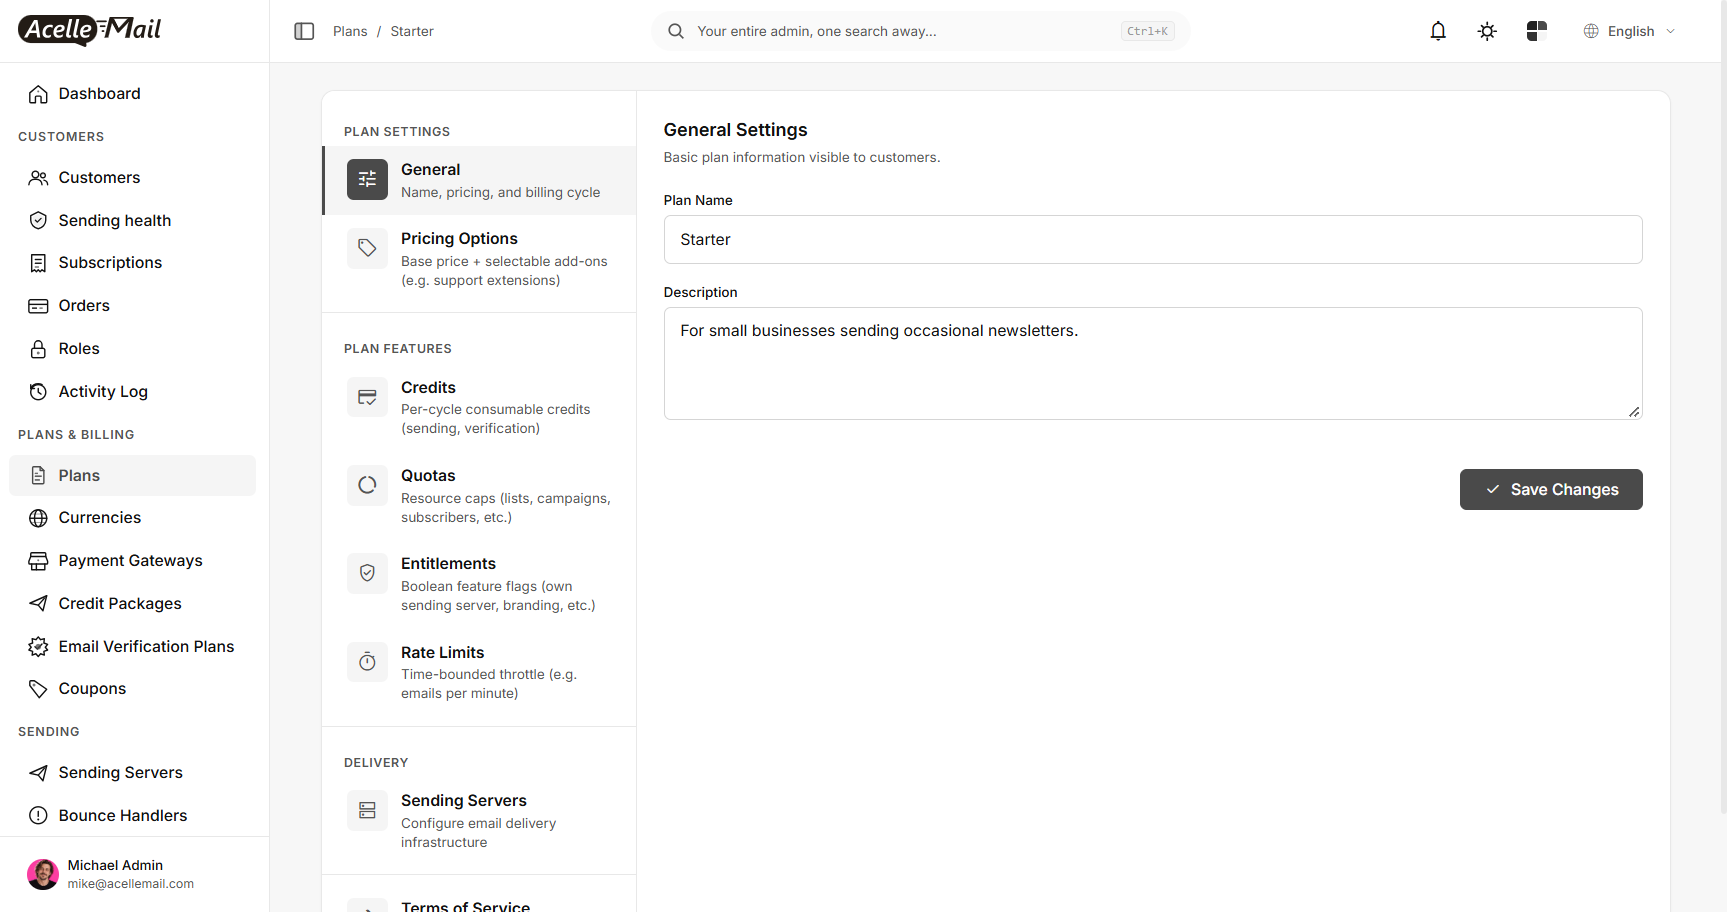
This guide edits Starter. Click Edit on its row. The plan opens with its settings grouped in a menu on the left.
Click Save Changes after you edit a section.
General#
General holds the Plan Name and Description. Users see both on the plan card when they choose a plan.
Pricing#
Open Pricing Options to set what the plan costs:
- Price and Currency.
- Billing Cycle: how often the user is charged, for example Monthly.
- Free Trial: turn on Enable free trial period, then set Trial Duration and Trial Period.
In the example, Starter costs 19.00 USD a month and starts with a 14-day trial.
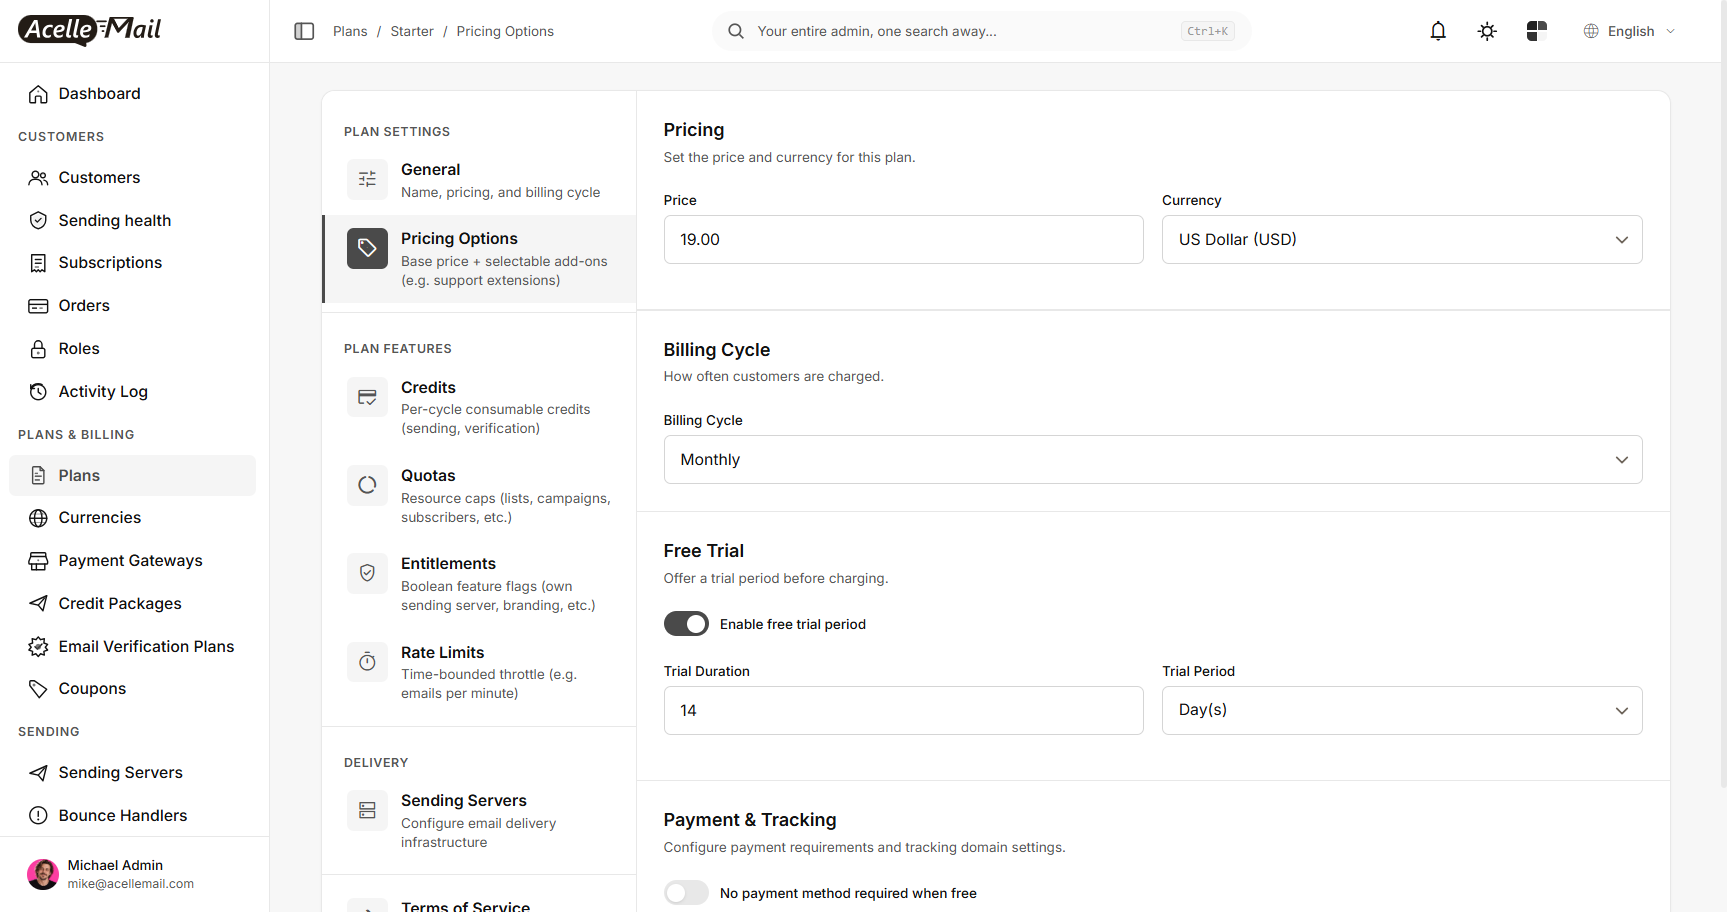
For a plan with price 0, also turn on No payment method required when free. Users can then take the plan without entering payment details.
Quotas#
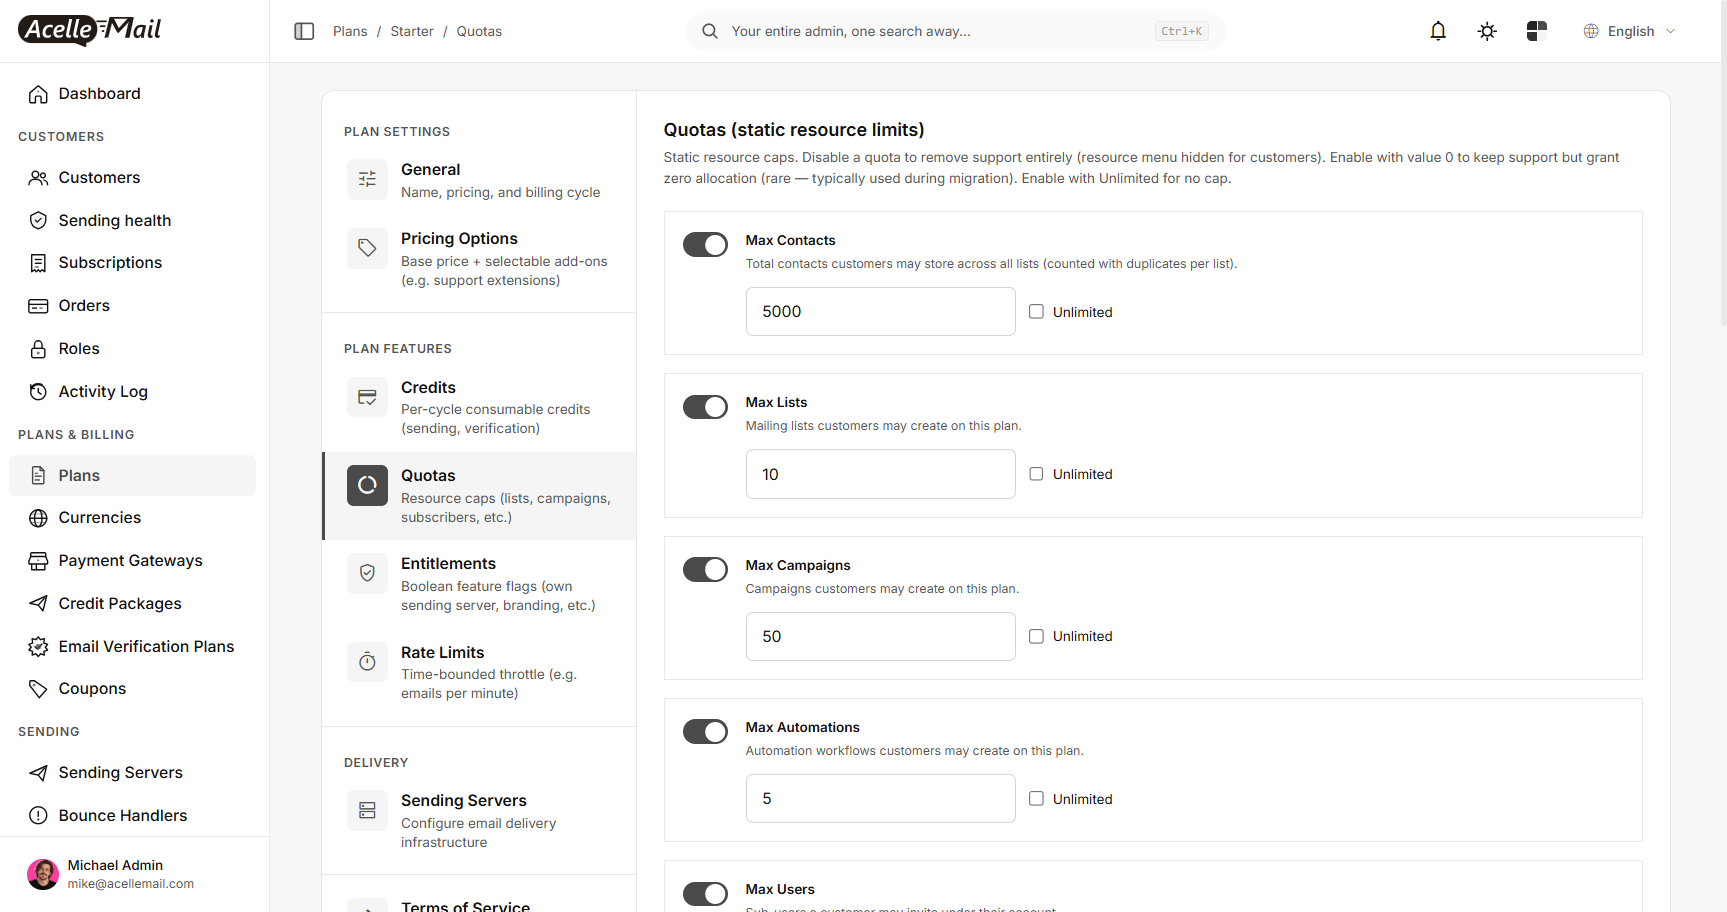
Quotas limits how much of each resource a user on this plan can have: Max Contacts, Max Lists, Max Campaigns, Max Automations, Max Users and more.
Each quota has a switch, a number and an Unlimited checkbox:
- The number is the limit. In the example, Starter allows 5,000 contacts, 10 lists, 50 campaigns and 5 automations.
- Unlimited removes the limit.
- Switching a quota off removes that resource from the plan, and its menu is hidden for users.
The number of emails a user can send in each billing cycle is not a quota. It is set under Credits, as Send Email. The plan list shows that number as sending credits.
Entitlements#
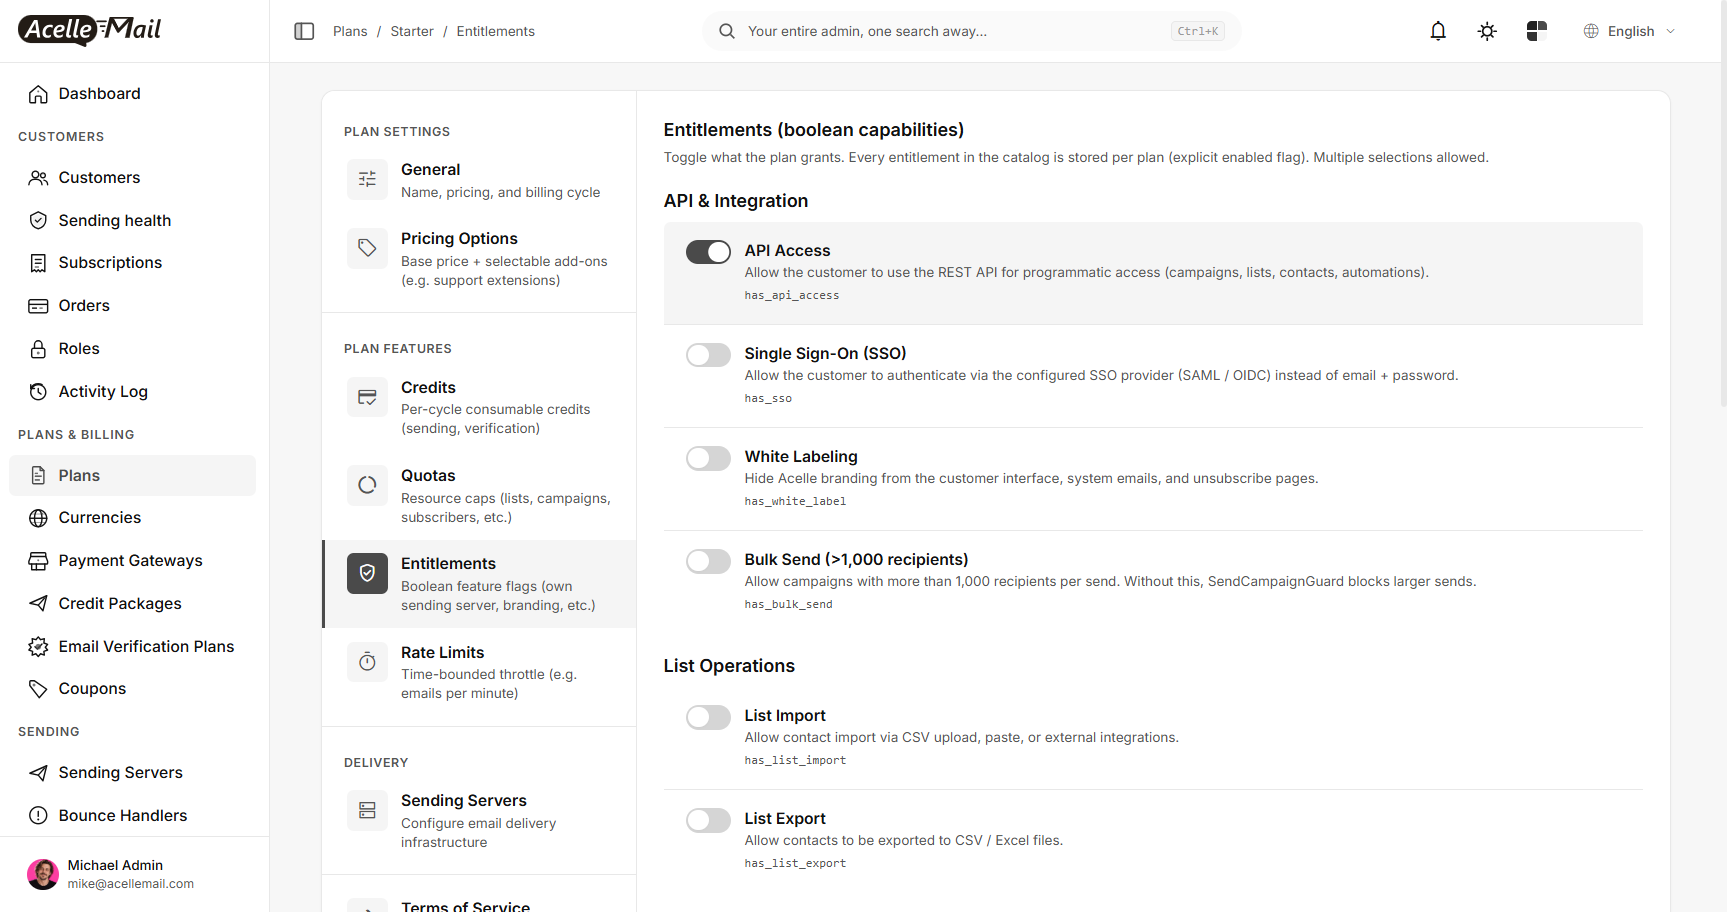
Entitlements are on/off switches for features. A quota sets how many of something a user can have. An entitlement sets whether a feature is available at all.
Examples are API Access, White Labeling, Bulk Send (>1,000 recipients), List Import and List Export.
Turn on what users of this plan should be able to use, and leave the rest off.
Sending servers#
Sending Servers, under Delivery in the left menu, decides which server delivers the email of the users on this plan. Check this section on every plan: a plan without a working sending server cannot send.
There are two options:
| Option |
What it means |
| System's Sending Servers |
Users send through the servers you added in the admin panel. They set up nothing themselves, and every user on the plan shares the same servers. |
| Own Sending Servers |
Each user adds and manages their own sending servers in their account. You choose which server types they may use and how many. |
Use System's Sending Servers when you provide the sending as part of your service. Use Own Sending Servers when users bring their own Amazon SES, SMTP or other sending account.
On a new installation, Free Forever and Starter use the system's servers. Growth, Pro and Enterprise use own servers.
This example uses System's Sending Servers with the server from step 8:
- Select System's Sending Servers. If you changed the option, click Save Changes.
- Under System Sending Servers, click Add Server.
- In the Add Sending Server window, choose the Amazon SES server and click Add Server.
On a new installation the plan already lists Local Sendmail as Primary. Remove it with the × on its row. Email is split between all the servers on a plan, so part of it would otherwise go to the placeholder server.
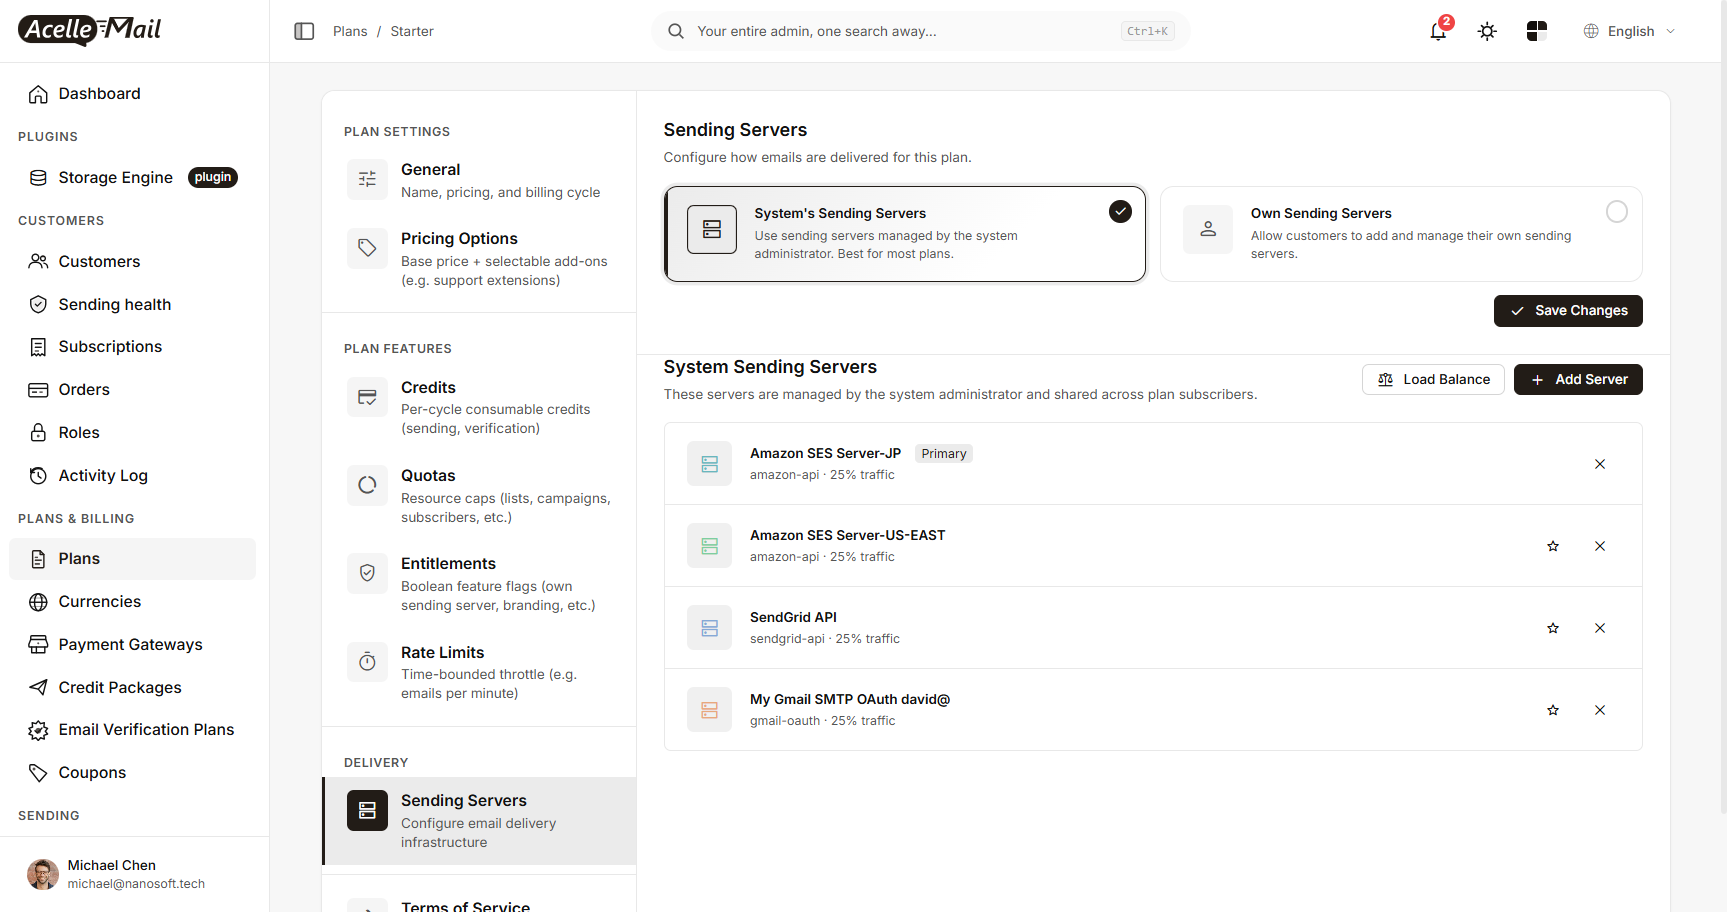
The screenshot shows a plan with four servers that each take 25% of the traffic. Load Balance changes that split, and the star on a row makes that server the primary one.
Sending Servers for a Plan: Shared Pool or Bring-Your-Own compares the two options in detail.
10. Make the plan visible#
Go back to Plans & Billing → Plans.
The switch at the left of each row sets whether users can see the plan. Make sure it is on for the plan you set up.
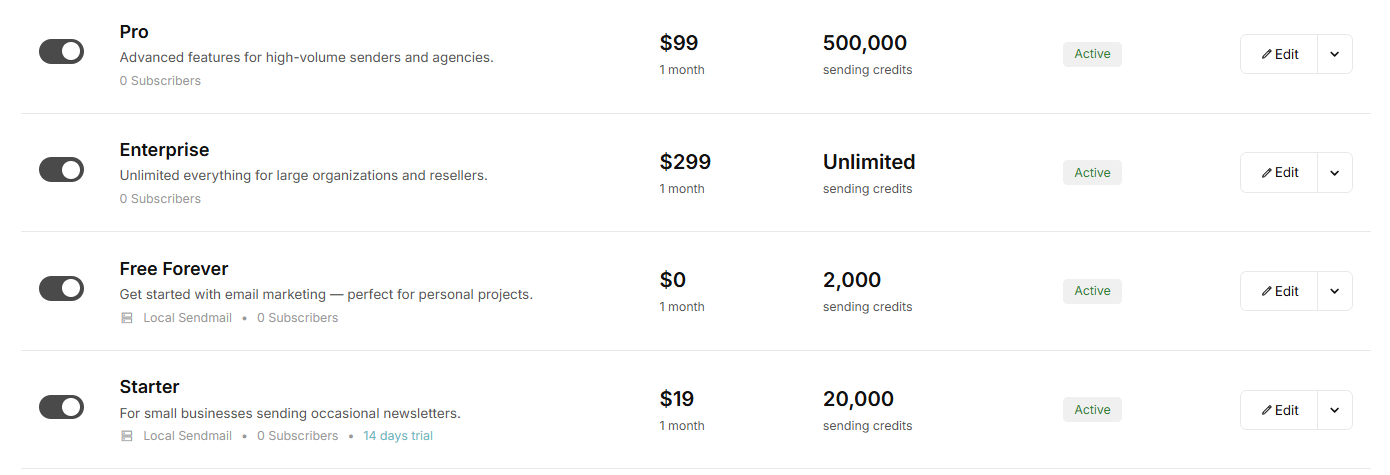
Switch off the plans you do not want to offer.
A plan that uses the system's servers cannot be switched on while it has no sending server.
11. Test as a user#
Check the result from the user's side.
Click your name at the bottom left of the admin panel and choose Back to app. You are now in the user area, with the user account that was created during the installation.
This account has no plan yet, so AcelleMail shows Find the right plan for your business with every visible plan.
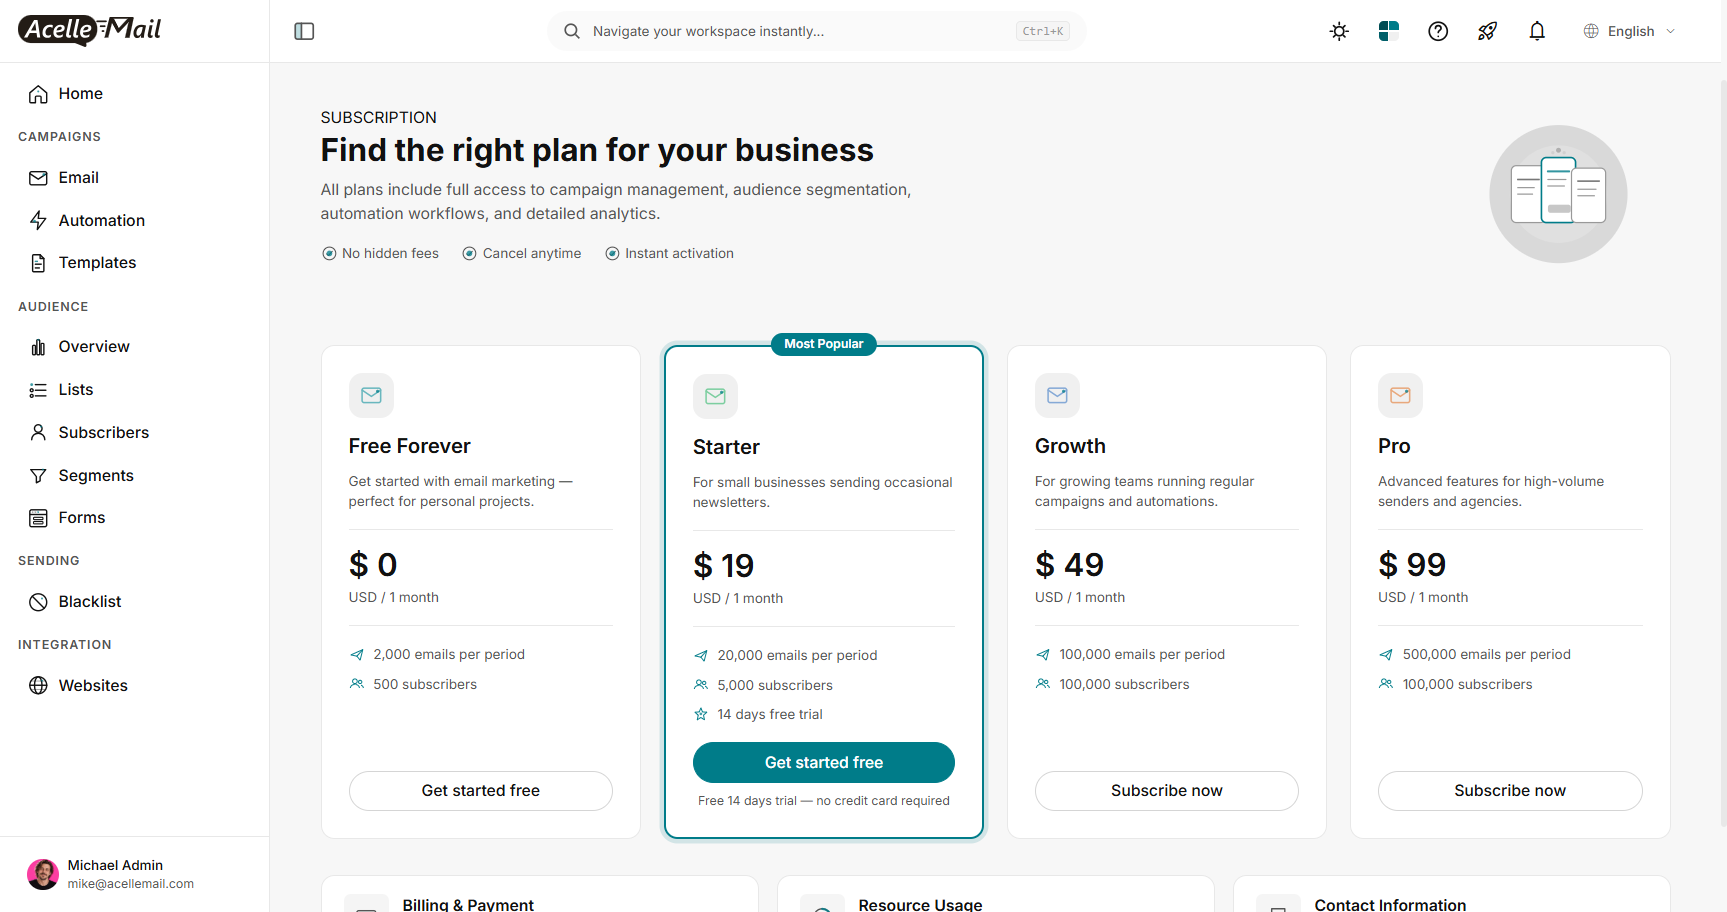
Click the button on a plan card. It reads Get started free on a free plan or a plan with a trial, and Subscribe now on a paid plan.
AcelleMail then takes the user through checkout: billing details and, when the plan requires it, a payment.
Once the subscription is active, the user can create a list and send a campaign.
Sign up as a new user#
To test the way a new customer arrives, log out and click Create an account on the login page. A new user chooses a plan on the same page.
Use AcelleMail only for yourself#
If you only send your own email and do not sell access, subscribe your own account to a free plan.
Set the plan's price to 0, turn on No payment method required when free, raise its credits and quotas to what you need, and switch off the other plans.
Common problems#
| What you see |
What it usually means |
Some requirements are not met. Please fix them and try again. |
A PHP extension or function is missing, or a folder is not writable. Each failed row names it. Fix it on the server and click Check Again. |
A MySQL error at the top of the Database step, such as Access denied for user |
The host, username, password or database name is wrong, or the database does not exist yet. The wizard does not create it. |
The table prefix must be 12 characters or fewer. |
Shorten the Table Prefix or leave it empty. |
The [/usr/bin/php] path does not exist or is not executable |
The selected PHP path is wrong for this server. Select another one, or use Other path. |
A line starting with ERROR: after Check & Save |
The PHP at that path is too old or lacks an extension. Select the path of the PHP version your website runs on. |
Please enable PHP exec() function for automatic cron job detection. |
exec() is disabled in PHP, so the wizard cannot detect or test PHP paths. Enable it, or enter the path yourself under Other path. |
Installation is already running — please wait a moment and do not submit twice. |
Initialize Database was submitted twice. Wait for the first run to finish. |
| A campaign stays in sending and nothing goes out |
The cron job from step 5 is not running. See My Campaign Is Stuck in "Sending". |
Cannot make this plan visible — no sending server is configured. Please assign a sending server first. |
The plan uses the system's servers and has none. Add one in the plan's Sending Servers section. |
An entitlement shows Needs "…" set to at least 1 (or Unlimited) before it can be turned on. |
That feature depends on a quota. Set the quota under Quotas first. |
No plans available on the user's plan page |
No plan is visible. Switch one on in Plans & Billing → Plans. |
What to do next#
Summary#
To install AcelleMail and get it ready to send:
- Unzip the package into the document root and open the domain.
- Pass the System Check.
- Enter the site name, the admin account and the system email settings.
- Enter the MySQL details and click Initialize Database.
- Select the PHP path and add the cron job line to the server.
- Log in and open the Admin panel.
- Add a sending server and run Test Connection.
- Edit a plan: price, quotas, entitlements and its sending server.
- Make sure the plan is visible.
- Switch to the user area with Back to app and subscribe to the plan.
